You can send and get information from a stack to web sites, or other internet hosts, that support REST API calls over a HTTP (or HTTPS) internet connection. First, use the Wifi hardware block to connect your stack to your local LAN and hence the internet. In your Stackbuilder blueprint, drag and drop the Wifi block from the Hardware tab into your blueprint. Then click once on the Wifi block to select it. Use the Property Editor in the bottom right to set the ’N’ property for LAN network name (SSID), and the ‘P’ property for the password.
Set Properties for Wifi block
Click on the first empty row’s first column under “PROPERTY” and type N (for Network name), hit Tab to go to the next column (“Default Value”) and type in the SSID of the wifi network you want to connect to, say for example “mynetwork” (type the quotes as well). Hit tab twice to move on to the next row. Now type P (for password), hit Tab to go to the next column and type in the password for the wifi network, say for example “mynetpass” (type the quotes as well) and hit tab twice to move on to the next row.
Put HTTP API block in your blueprint
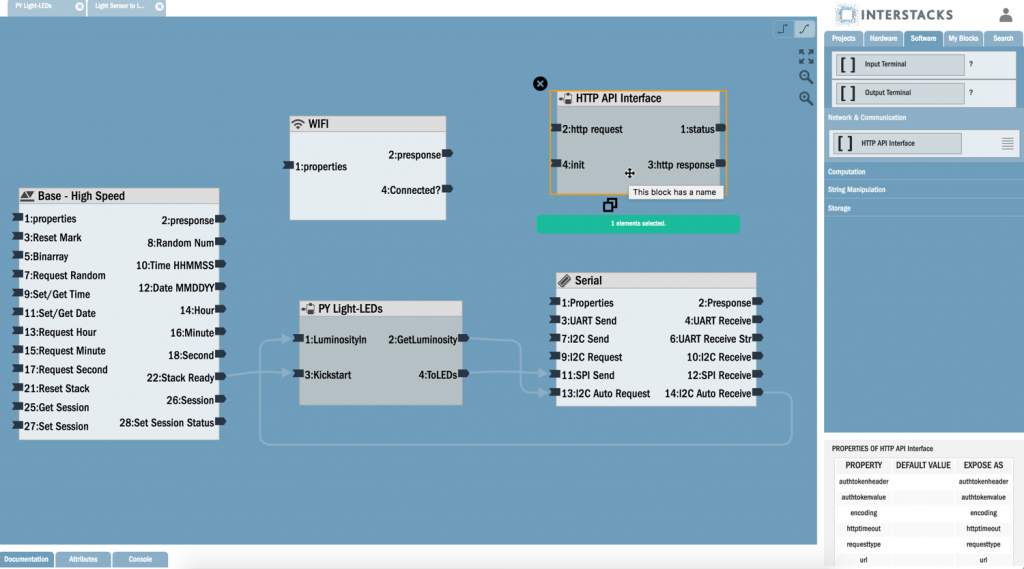
To set up a HTTP API to the server of your choice, on the Right Rail of tabs, click on Library and then click on “Network & Communication” to reveal the “HTTP API Interface” block. Drag and drop the block onto the project. When you click once on the HTTP API block, notice the properties on the bottom right corner as shown in the screenshot below.
Set Properties for HTTP API block
You can configure the properties of the HTTP API Interface to point to your server and compose the message format to send. Click on the DEFAULT VALUE column of each property to set its value. Set all string values within “” marks and make sure you hit the Tab key to tab out of the column. The property definitions are as follows.
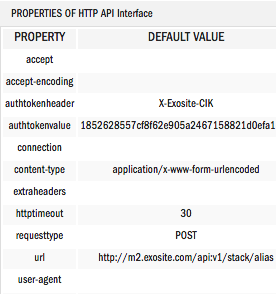
Url – The REST URL of the server. For Exosite, it is “http://m2.exosite.com/api:v1/stack/alias“. Fill in your server address (it could be IP address as well, but prefix it with http:// for example “http://123.123.123.123/Mydata/dataid/“).
Httptimeout – This represents the timeout in seconds, after which a HTTP connection will be reset if not completed. The default is 30 seconds. This should be entered as a number without quotes.
Requesttype – The type of the HTTP request. For Exosite it is “POST”. Other possible values are “GET”, and “PUT”.
The rest of the properties define some of the common message headers to be used in a HTTP request/response. For in-depth details, refer to the Headers section of the HTTP/1.1 protocol RFC at https://www.w3.org/Protocols/rfc2616/rfc2616-sec14.html. Some common headers exposed as part of the API are as follows:
connection – Specifies the option for that particular HTTP connection. The default is set to ‘Close’ indicating the connection will be closed after completion of the response.
content-type – This refers to the encoding type of the data being sent to the server. For Exosite, the value is “application/x-www-form-urlencoded”. Other values are “application/json” for example, to send JSON data.
accept – Refers to the acceptable media types in the response for the request. This is by default set to / which indicates all media types.
accept-encoding – Similar to Accept, but restricts the content-codings that are acceptable in the response. By default, it is not set (or set to None) implying there is no restriction on the encoding types that will be accepted in the response.
Authtokenheader – If your REST API server requires a security header to verify the authenticity, specify the name of the header. For example ( We will be using Exosite – a cloud based IOT data aggregator to illustrate the setup), “X-Exosite-CIK” as the default value.
Authtokenvalue – This is the security token that identifies the user with the server. In the Exosite example, this is provided by them per user, which should be kept secret. Fill in your own secret, if your server requires it.
user-agent – Specifies information about the client agent originating the request. The default value is ‘python-requests/2.8.0’ indicating the underlying python based HTTP request block.
extraheaders – Optional header/value pairs that could be added in addition to the already provided header options.
After configuring this block, any correctly formatted data sent into the “http request” terminal of this block will be sent out to the server via REST calls. The entire HTTP response to the REST call is available from the “http response” terminal of this block, which can be wired to any of your logic. The “status” terminal is a short-hand in case all you want to know is success or failure. A value of 0 from this terminal means success and -1 means failure.
Your blueprint should wait to send/receive (“POST” / “GET”) from the HTTP block until the Wifi block has established a connection to your LAN. Its “Connected?” output terminal will send an integer value of 2, once it is connected and has an IP address assigned.
If you want to GET information from a web site, for example the weather, you will often just send an empty string “” to the “Http Request” input terminal, after setting all of the appropriate properties for the block. The Request type would be set to “GET” and the url might be of the form: “http://forecast.weather.gov/MapClick.php?lat=38.4247341&lon=-86.9624086&FcstType=json“.
As an example, here’s a code snippet (from Exosite example) for formatting a list of sensor data as a form-urlencoded string. You can create a new Software Block and copy paste the snippet below in the code area of the handler.
    #sensor values set to some test values. In this example, we have 5 sensor readings.
    temp,humid,co2,part1,part2 = [10,20,30,40,50]

    #convert to form-urlencoded string
    form-urlmessage = "temperature=%f&humidity=%f&co2=%d&smparticle=%d&lgparticle=%d" %(temp,humid,co2,part1,part2)

    #send out the message, the channel from this output is wired into the "http request" terminal of the HTTP API block
    I.sendmessage(2,form-urlmessage)
If you would like to send JSON data instead:
    import json
    temp,humid,co2,part1,part2 = [10,20,30,40,50] #sensor values set to some test values

    #convert to json data
    jsonmessage = json.dumps({"temperature":temp,"humidity":humid,"co2":co2,"smparticle":part1,"lgparticle":part2})

    I.sendmessage(2,jsonmessage)
Refer to documentation on many other topics at interstacks.com/knowledge-base.
Please email info@interstacks.com with any questions.